Thursday, October 26, 2006

The Bike and the Tree


Vrksasana (Tree Pose) is one of those poses that either you love or hate; obviously, the intensity of those feelings depends on how easily you can do the pose. Either you balance and can feel the alignment of your body from the sole of your foot through the top of your head, or you tip over as soon as one foot comes off the ground.

As a teacher, I find it a very compelling pose because the basic shape of the pose is easy for most students and, once they manage to balance—even for a few seconds, they get a great sense of accomplishment. It’s kind of like learning to ride a bike; when you finally figure out how to center yourself and balance it is an exhilarating and weightless feeling. Until then, you lean over, stumble to catch yourself and become frustrated. Here are your training wheels…

Vrksasana Prep
The most important part of the pose is finding your balance (well, duh, you say) but also finding the confidence to let go of your support and trust the alignment of your body and the strength of your legs.

1. Against the Wall-The easiest way to help yourself is to do Tree Pose with your back to the wall. At first, you will just rest your seat and back against the wall, with the heel of the foot a few inches from the wall, so that you can establish line up of the pose even though you are leaning. Try to ground evenly through the sole of the standing foot, but mostly just notice how the whole thing feels-hips even, knee stretched to the side, shoulders balanced over hips. Close your eyes and let your body feel the pose…the slight lean into the wall’s support should keep you standing.

2. Lifting off the Wall- Once the leaning position becomes comfortable and easy, try it with the heel about 5 inches away from the wall. Then press the fingertips to the wall at the hips and gently lift the hips and upper body away so you are balanced over the standing leg, but still feel supported through the fingertips. If you feel aligned, lift the fingertips off the wall for a few moments…or longer if you feel balanced. Let yourself rest against the wall if you start to feel wobbly, then realign and press away again.

3. Facing the Wall- By now, you should start to recognize the feeling of alignment and can turn around. This time, keep the fingertips on the wall about shoulder-height and come into the pose while facing the wall. You can lean into your fingers if the urge to tip comes over you, but keep trying to press your upper body over the lower so your weight is evenly distributed up and down the spine and onto the standing leg.
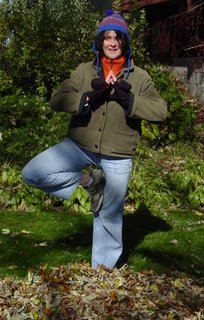
4. Side to the Wall
- When you are ready, and only if you feel confident—doubt will knock you over as soon as imbalance will—turn your side to the wall, so you can only place one hand on the wall. Come into the pose with this slight support and then try to lift the hand off the wall. By now, you should be familiar with the feeling of alignment and the solid pressure on the grounded standing foot. Try to recapture that feeling, with just the palm and then fingertips of one hand…and then no hand at all. Keep the pose under control and if you start to lean, rest the hand on the wall again until you feel stable.

Think back to how long some one had to run behind you on your bike until that day when s/he let go and you sailed off. And as you lift up and ground down, as you lengthen and balance, you can think grateful and thoughts towards the person who was behind you on that bike. I suppose you can think grateful thoughts towards the wall, too, but it’s not quite as inspiring. Either way, Vrksasana is a peaceful pose, once you master it, and is an appropriate dedication to someone (thing?) who has been a great source of support and confidence. ©Brenda K. Plakans. All Rights Reserved.

Sunday, October 15, 2006

Mirror, Mirror, On The Wall…


One of the reasons I prefer Iyengar yoga, and like to teach it, is that each pose is its own entity. You establish your correct position and alignment and then stay there, keenly aware of the work necessary to achieve the pose and the benefits derived from that work. You can’t use momentum or sneak out of the more difficult poses; it’s your mind and your muscles present in that particular moment. Of course, how do you know if you are in the pose correctly so you are helping your body, not hurting it? Well, first of all, you should try to have a class with a trained teacher every once and awhile so s/he can help you do each asana correctly. When you are on your own, here are a few tricks to doing your own adjustments.

Probably the easiest way to correct is in a mirror. Set up your yoga mat in front of the mirror so you can check your alignment, but still have room to do the full pose. Place yourself so you don’t have to crane your neck to see, which can alter your positioning. Once you have adjusted the pose, close your eyes and spend a few moments really feeling the pose—you won’t always have the mirror and you need to retain your sense of the pose and store it in your muscles’ memory. Things that are easy to look for include:

-Trikonasana (Triangle): from the side, check the squareness of the hips and the line-up of knee and top of foot
-Virabhadrasana II (Warrior 2): same as Triangle, also check the level of the arms
-Parsvakonasana (Lateral Angle): same as Warrior 2, from the front check for a straight line from ankle to wrist
-Any sitting pose: from the side you can look at the line-up of ears, shoulders and hips; from the front you can check to see if the hips and knees are level
-Forward bends: from the side you can make sure the spine is long and you are folding from the hip crease
-Twists: make sure the head is lined up with the tailbone and you aren’t leaning back, that the chin is parallel to floor

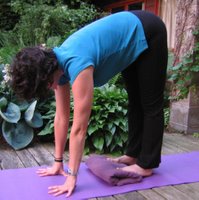
Another possibility, which usually requires an assistant, is to take a picture of yourself doing the pose. This doesn’t offer immediate adjustment possibilities, but with more angles to look at, you get a better sense of the whole pose (digital is semi-immediate). I present two versions of Uttanasana (Standing Forward Bend) as an example: In the first picture, you can see my hips are too far back which means I’m not grounding evenly through my feet. This lifts my hands off the floor and I’m also rounding my back slightly to help balance. In the second photo, I’ve brought my hips forward and now my hands can press to the floor so the arms are more engaged and my spine lengthens. I didn’t stage the first photo—after checking it on the camera, I realized what needed adjusting. I have to admit, taking a lot of pictures for this blog has made me very aware of the fine tuning required in even the most basic of poses!

While it’s important to check the accuracy of your poses, don’t get too bogged down in being “correct.” As you continue to practice, your body will learn where it should place itself and you will come to the position automatically and then do fine tuning once you are in place. This subtle work you do while in the pose is the essence of yoga; your awareness of your body in each asana in each specific moment. You won’t need a mirror to tell you who is the fairest in the land; you will know it in your heart. O Great Queen (or King)! ©Brenda K. Plakans. All Rights Reserved.

Sunday, October 08, 2006

Planes, Train and Automobiles


This weekend, Jim, Eamonn and I took a trip to the Illinois Railway Museum. Trains are very big at our house right now, and one of my students who volunteers at the museum thought E would enjoy seeing and riding on the real thing. As we clattered along the track in one of the interurban cars, I wondered what travel in one of these things would have been like in the 1930s. The bench seats were just a little bit more comfortable than a school bus’ and the windows were huge—nice for the view, but all kinds of grit would fly in in the summer. I suspect you would be very stiff and dirty after about 2 hours.

When travelling nowadays, while you won’t get a face full of soot, being stiff and cramped in close seating hasn’t changed much. So, I’ve put together a (mostly) seated practice that you can do to get the blood flowing whether you are on the move or are stuck at a desk all day. It doesn’t take much to reenergize the muscles and realign the spine, you just have to make a conscious effort to do so every hour. And, if boarding restrictions continue--no Cheez Whiz, by the way--stretching may be the only thing you can do on the plane beside watch last month’s movies!

Seated Stretches

Sitting Tall- If you don’t have room to sit cross-legged, scoot to the end of your chair so you can rest evenly on the sit bones and lift up with the top of the head. Lengthen the spine and line the shoulders up with the hips. Breathe for awhile in this aligned position.

Seated Dandasana (Staff pose)- In this variation on a forward bend, stretch your legs out so that the feet are flexed and you’re gently pressing the backs of the legs towards the floor. Make sure you don’t lock your knees—slightly bend them, if necessary. Keep the spine long and the chest lifted and fold forward from the hip crease. As you tip the pelvis towards the thighs, notice the opening in the backs of the legs.

Hastasana (Overhead arm stretch)- Come back to your seated position and stretch your clasped fingers towards the luggage bin (be careful not to hit the attendant button). Turn the palms up, press the shoulders down and lengthen the neck. Then, slightly bend the elbows, draw the palms farther back and try to straighten the arms again. Notice the deep rotation in the shoulder joints.


Gomukhasana (arms) (Cow’s head pose)- Release your arms down to the side, then bend the right arm overhead and reach up in back with the left hand and try to interlock your fingers. If the hands don’t reach, try and take hold of the back of your chair so you can anchor the pose. Stretch the elbows away from each other and slightly towards the center. Repeat on the other side.

Seated Twist- Keep the feet planted firmly and the hips stationary as you exhale and start to twist the torso towards the right. Use your hands on your legs or armrest to help deepen the twist. Slowly rotate the spine, starting with the lower back, then rib cage and finally shoulders and head so the twist moves from the least flexible part of the spine to the most flexible. Keep lengthening the neck and balancing the shoulders over the hips. Repeat on other side. You can use this pose to check out the offerings on the duty free cart or your seat mate’s reading material…

Trikonasana (Triangle)- If you have room, and can leave your seat, find a spot by the rear exit or near a galley to step into a quick triangle. The extension of the arms and twist of the torso feel great after sitting and the stretch in the legs helps prevent cramps. Plus, if it’s a long flight, there may be a beverage station so you can grab some juice or water to stay hydrated. Be careful not to block the bathroom door. Bon Voyage!
©Brenda K. Plakans. All Rights Reserved.

Wednesday, October 04, 2006

Parsvottanasana—not for wimps!

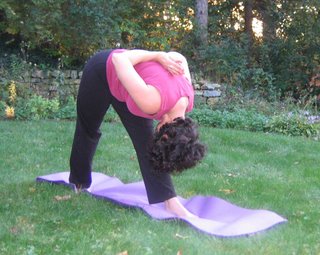
Last week, I taught a number of classes culminating in parsvottanasana (intense side stretch pose). It is not often a favorite, but it is one of those poses that are very efficient so you can do one as your 10 minute-work-out sometime when you are rushed. It’s even better when you take some time to work up to it, so that is my posting for this week. Give it, or one of the modifications, a try and notice the great stretch in the legs, opening of the chest and engagement of the torso muscles.

Parsvottanasana Sequence
-Tadasana (mountain pose): Start standing up and take some time to really ground through the soles of the feet, lengthen the side ribs and stretch up with the top of the head.

-Hastasana (overheard arm stretch): Stretch the arms to the side and then overhead, interlocking the fingers and turning the palms up. Keep the neck long and the shoulders down. When you lower the arms, try to maintain the lift in the rib cage without hunching the shoulders.

-Right angle stretch- Stand with the hands on the wall, or a chair back, hip distance apart, at hip level or a little higher (if your shoulders are tight). Step the feet back until the hips are directly over the ankles and the body makes a sharp right angle. Press your fingertips to the wall, press your sit bones away from the wall and enjoy the stretch up and down the sides of the body.


-Parsvottanasana Prep- Bend the knees and come to standing, but note where your feet were in the right angle stretch. Step your feet apart from this point, so your torso is that distance from the wall (maybe 3-4 feet). Now turn the wall foot towards the wall, your center foot slightly in and turn both hips to face the wall. Take a moment to really square the hips to the wall and lift up to the side ribs…

-Then, ground thru the back heel and gently press the back of the knee to the center of the room; press both sides of the front foot to the floor; and hinge forward from the hip crease, keeping the spine long. When the body is parallel to the floor (or however far you can come with the back long), stretch the hands out and press your fingertips to the wall to help balance the torso. Make sure the feet stay grounded and the hips square.


-Parsvottanasana (intense side stretch)-If you want to deepen the stretch, release the hands from the wall and bring them to Namaste behind the back (or cross the forearms at the lower back). Relax the spine and round down over the front leg, keeping the hips squared and the feet grounding. Then lift the spine back to parallel and then to upright. Turn the hips to center and release the arms. Come back to Tadasana and start the sequence for the other side…

Viparita Karani (Legs-up-the-wall Pose) - After all this work in the spine, it feels great to elevate the feet and let the weight of the legs gently press your lower back to the floor. Stay and long as you want and then lower the feet to a Baddha Konasana (Bound Angle) or Sukhasana (Easy pose) position. Roll to the side and come back up to sitting.

©Brenda K. Plakans. All Rights Reserved.

Monday, October 02, 2006

REMINDER...

Remember…it is very important that you always take time to arrange your props correctly. Especially in relaxation poses, so you can really release in their support. (Thank you, Milo for that demonstration…)


Tomorrow...Parsvottanasna!