This short post has nothing to do with yoga, but is a quick shout-out to my Mom's new blog, Latvia's Friend. She is a part of a knitting trip that is vising Scandinavia and the Baltics in July; Latvia's Friend is intended to give the group some information about that part of the world.
If you want to see some great pictures of storks and church spires, check it out!
Monday, April 30, 2007
Friday, April 27, 2007
Getting Rid of the Judge
(For the last few months I have been heavy on the Yoga Practice, not so much on the Yoga Thoughts. Let me try and remedy this situation…)

Monday, April 23, 2007
Keep Track in Back
Last Thursday, I taught a Warrior class with special emphasis on the back foot. It’s a variation that my teacher in Washington DC, Oya Horiguchi, is fond of because it makes you so aware of the placement of your hips and the grounding of the feet. In Virabhadrasana I, II, III much of your focus, and even your movement, is forwards, so there is a tendency to lean that direction and forget about what is going on behind you. By isolating the action of the back foot and leg, you become aware of that side of the body and get a much more even stretch. Let me show you…(my pictures are of the regular poses—to modify, just arrange your mat perpendicular to the wall with one edge touching and follow the directions below).

Stand with your back to a wall, and then step the right foot forward into the pre-Warrior straddle. Make sure the left heel is in contact with the wall, so when you ground through the sole of that foot you are aware of the pressure of your foot against the wall. Maintain that pressure as you lengthen the back of the left leg and gently press the left hip forward so that it is even with the right. Now bend the right knee, keeping it in line with the top of the right foot. Check in with the left leg, are you still pressing the heel to the wall and lengthening the back of the leg? Once you establish the lower body, lift the arms overhead, interlock the fingers and lengthen the neck back. Again, see if the left leg has started to soften, and if it has, re-press and engage. Repeat with the right foot in back.

This time, stand with your left side at the wall and step into a side straddle, with the side of the left foot against the wall. Turn your right foot towards the front of your mat, and turn the left toes slightly toward center. Again, solidly ground through the bottoms of both feet and notice the press at the wall. Bend the right knee, keeping your right thigh and both hips parallel to the side of your mat. Be keenly aware of the contact of your left heel and the work of the left thigh to keep the foot in place. Now raise your arms to either side, extend and turn your head towards the right hand (you may have to rest your left palm on the wall).
Bring your attention to the back leg, making sure the knee hasn’t softened and the heel is still grounded. Check to see that you haven’t shifted your weight onto the toes of the right foot (lift them and press into the heel). Lift the side ribs and align the head with the tailbone, which should be easier because of the strength of your base. Repeat with the right foot in back.
 Virabhadrasana III (Warrior 3)
Warrior 3 is a bit harder to work with, because of the balance aspect; nonetheless, bringing awareness to the back leg and foot make it a stronger pose and help you level out the hips. You may find the contact between foot and wall help you balance longer, as well. Measure your starting point, by standing facing the wall and stretching out your foot at a right angle to your standing leg, so the sole of the extended foot is touching the wall. Lower the leg and turn to face away from the wall.
Wednesday, April 18, 2007
A Change in Perspective
The other key is to think of the pose as a chest opener, even if the arms are in front of the body. If you don’t engage the upper back by drawing the shoulder blades together and down (away from the neck), the torso will sag and you will put extra weight on your head. You need to feel that opening across the chest and that pressure of the forearms to the floor to keep the spine long all the way from the skull to the tailbone. The following practice will emphasize this opening, so when you do come up, you can already have the feeling in your body.
Give it a try, with your thoughts in your chest and upper back. If you haven’t done a headstand for awhile, just do the prep poses and keep the feet on the floor in the half-headstand (or Dolphin pose). Enjoy the feeling of upside down (and keep an eye on your cat or dog--or toddler--this pose seems to encourage pets and kids to sit right by your face, Achoo!).
Salamba Sirsasana (Headstand)
**Don’t try a headstand, until you have learned how to do one with an experienced teacher. S/he will teach you the proper positioning so you don’t hurt your neck. **
Tadasana (Mountain Pose)-Feel your tall, aligned spine as you ground down through your feet and stretch up through the top of the head. Gently draw the shoulder blades together and down the back (but don’t arch the upper back).
Hastasana (Overhead Arm Pose)-Add the arm stretch and feel the side ribs lift, while keeping the shoulders away from the ears. Bring your attention to the shoulder blades, again, but maintain the length in the spine.
Uttanasana (Intense Forward Bend)-Fold from the hips while stretching through the backs of the legs. Keep the weight balanced between the balls and heels of the feet. Bend the knees slightly to release the lower back and let your torso hang.
Adho Mukha Svanasana (Downward Facing Dog)-Keep the spine elongated while the shoulder blades slide down the back (away from the shoulders). Although you are inverted, concentrate on keeping the chest open and the arms strong (as they were in Hastasana).
Balasana (Child’s Pose)-Come down to the floor and let the whole body relax
Salamba Sirsasana (Headstand)-Try this against the wall, or, better yet, in a corner so that you have support at your back and heels. Use a folded blanket under the head and forearms for cushioning. Keep the elbows shoulder-distance apart (but not more) so you can press the forearms to the floor. Kick up each leg separately, until the heels are against the wall. Try to recall the aligned feeling from Tadasana, except this time reach through the head to the floor and the heels to the ceiling. Recreate the open chest/engaged arms and shoulder from Dog so the upper body doesn’t sag.
Half Headstand-if you’re not ready for the full pose, try this modification. Make a tripod with the hands and forearms and place the top of the head (halfway between the ears) on the floor so the palms are resting against the back of the head and the knuckles are gently resting against the wall. Straighten the legs as for Dog, so that only part of the torso’s weight is balanced on the head. Slowly walk the feet forwards to bring the back closer to the wall
Balasana (Child’s Pose)-Lower yourself back to the floor and rest as long as you like.
Seated twist-Take advantage of your stretched-out torso as you slowly twist the ribcage around the spine, while sitting in Sukhasana (Easy Pose).
Savasana (Corpse Pose)-try to recreate the alignment from your Mountain and Headstand, while releasing all your muscles into the support of the floor. ©Brenda K. Plakans. All Rights Reserved.
Wednesday, April 11, 2007
You Call This April!?!?
I don’t know what the weather is like in your part of the world, but in mine—Wisconsin—it stinks. We are supposed to have 3-5” of snow today, with the possibility of accumulating 8-12” by this evening. All the daffodils and iris and tulips have lovely green shoots that are now completely weighted down with snow. At least the goldfinches have started to turn yellow again, so they are sort of pretty against the white (if you need something positive to say about all of this).

[Breath is indicated if you are doing this as a flow sequence; otherwise try to hold each pose for at least 5 breaths]
Tadasana (Mountain)[inhale-exhale]: standing with the feet parallel, open the arms to the sky and slightly arch the back. Keeping the back long, fold forward at the hips.
Uttanasana (Intense Forward Bend)[inhale-exhale]: reach for the thighs/shins/ankles-- first with straight arms and a long back, then bend the arms and relax the back to let the head come closer to the knees
-Both hands come to floor and step the right foot back while bending the left knee [inhale].
Virabhadrasana I (Warrior I) [exhale]: lift the torso and reach the interlocked fingers overhead, looking towards the hands. {Modify by keeping the head looking forwards and rest the hands on the left thigh.}
-Fold forwards and bring both hands back to the floor [inhale].
Adho Mukha Svanasana (Downward Dog) [exhale]: step the left foot back, lift the hips and lower the head into Dog.
Plank [inhale]: lower the hips and straighten the back.
Urdha Mukha Svanasana (Upward Dog) [exhale]: sink hips towards the floor and lift the head into Up Dog. {Modify by lowering the knees to the mat.}
Plank [inhale]: lift the hips to be level with the shoulders and straighten the back.
Adho Mukha Svanasana (Downward Dog) [exhale]: lift the hips and lower the head into Dog.
-Step the right foot forward [inhale].
Virabhadrasana I (Warrior I) [exhale]: lift the torso and reach the interlocked fingers overhead, looking towards the hands. {Modify by keeping the head looking forwards and rest the hands on the right thigh.}
-Both hands come to floor and step the left foot forwards while bending the both knees [inhale].
Uttanasana (Intense Forward Bend)[exhale]: straighten the legs and reach for the thighs/shins/ankles and bend the arms, letting the head come closer to the knees.
Tadasana (Mountain)[inhale]: Straighten the legs without locking them and, unfolding from the hips, come back to standing. Lift the arms to the sky.
Anjali Mudra (Namaste hand position) [exhale]: lift from the top of the head and ground through the soles of the feet as you bring your palms together at chest level. Repeat entire, starting with the left foot. ©Brenda K. Plakans. All Rights Reserved.
Friday, April 06, 2007
Yoga face…
There was an article in last week’s New York Times about a new kind of yoga class: facelift yoga. Apparently, some studios have started offering classes that promise the kind of tightening and lifting you can get under the knife, through yoga practice. One studio even got a threatening letter from the Botox people for naming a class “Yo-tox” (I’m not sure I understand wanting to equate your practice to a chemical you inject to paralyze facial muscles—kind of an oxymoron, don’t you think?).
Sukhasana (Easy Pose) Sit in a comfortable, cross-legged position with the sitbones on a folded blanket. Increase the height of the blanket if you can’t sit without rounding the lower back. Take a few minutes to really concentrate on balancing the pelvis and lengthening the spine.
 Virasana + Namaste (Hero Pose with Namaste hands in back) Lower your hips between your ankles (or onto a block), trying to keep the knees together. Keep the lower spine long and make sure the tailbone points down. Try to hold the pose for a while and, if you can, lower your hips closer to the floor to deepen the stretch. This may work better with a folded blanket than a block under the hips. Bring the hands behind the back and either cross the arms at the lower back or bring the hands to the prayer position.
Shoulder Opener at the Wall Come to standing. Make a tripod with your hands and arms, so that the fingers are interlocked and the elbows are shoulder distance apart. Press the forearms to the wall at chest-height and step the feet back, so you fold at the hips. Drop the head between the forearms and feel the stretch around the shoulder blades and arm pits. Deepen the stretch by stepping farther away from the wall.

Monday, April 02, 2007
A Blast from the Past
First of all, check out my article in yogajournal.com's newsletter for teachers, My Yoga Mentor. It's about refreshing your teaching, if you find yourself in a rut, with suggestions from various senior teachers.
Secondly, I apologize for the break in postings...I've been bogged down with a very demanding project and haven't had time to write something new. So, I've dug down into the "archives" to find a favorite posting from last summer. Hopefully, it's new to many of you and for those of you who remember it, maybe the review will inspire a nice round of beautifully-executed Dogs. Here it is...
Learning to Love the Dog (Again)
After class last week, a couple of my students were discussing how much trouble they had with Adho Mukha Svanasana (Downward-Facing Dog) and decided that they just didn’t have the upper body strength for the pose. This is a common problem for people with stiff shoulders or upper backs; the pose becomes a version of Plank Pose, because they can’t lengthen the upper torso and rotate their shoulders enough to get into the inverted V of Dog. All the weight of the upper body is on the arms and wrists, instead of being equally suspended between the legs and arms. This is a very strenuous position and, because of the strain, people stop breathing evenly and blood starts to rush to the head. Needless to say, this does not make for a very calming pose.
 Right Angle to the Wall Stretch Stand with the hands against the wall, even with the shoulders, and the step the feet back until your head, arms and side ribs are in a straight line. Press the finger tips to the wall as you stretch your sit bones back to lengthen the sides of the torso. To deepen the rotation of the shoulders, relax the upper back and let the head hang between the arms.**Is it just me, or do toddlers act just like cats when they get around a yoga mat?**

Tripod Shoulder Opener Form a tripod with the elbows, sides of the arms and sides of the hands (fingers clasped or fingertips pressing together). Press the tripod to the wall at shoulder height and step back until you can hang your head between your hands. Feel the stretch around the shoulder blades and in the armpits.
Secondly, I apologize for the break in postings...I've been bogged down with a very demanding project and haven't had time to write something new. So, I've dug down into the "archives" to find a favorite posting from last summer. Hopefully, it's new to many of you and for those of you who remember it, maybe the review will inspire a nice round of beautifully-executed Dogs. Here it is...
Learning to Love the Dog (Again)
After class last week, a couple of my students were discussing how much trouble they had with Adho Mukha Svanasana (Downward-Facing Dog) and decided that they just didn’t have the upper body strength for the pose. This is a common problem for people with stiff shoulders or upper backs; the pose becomes a version of Plank Pose, because they can’t lengthen the upper torso and rotate their shoulders enough to get into the inverted V of Dog. All the weight of the upper body is on the arms and wrists, instead of being equally suspended between the legs and arms. This is a very strenuous position and, because of the strain, people stop breathing evenly and blood starts to rush to the head. Needless to say, this does not make for a very calming pose.
So, in honor of Madame Purl and Dan, I offer this sequence for shoulder opening. Be honest with yourself and don’t overdo any of the stretches or force your body out of alignment. The idea is to work on the rotation of your shoulders and find a place where you can feel the upper back working, while the spine is still lengthening. Even if you don’t have trouble with your Dog, this is a wonderful series to work any tension out of your upper torso and will help you stay in DFD even longer to get the maximum benefits of the inversion. Enjoy!
Shoulder Opening Sequence
Tadasana with Hastasana Arms (Mountain Pose with Overhead Arms) Extend the spine and side ribs as you stretch your palms towards the ceiling. Keep the neck long and the shoulders away from the ears. If you need to slightly bend the arms to stretch up, do so.
Extended legs with Gomukhasana (Cow’s Head Pose) Arms Step your feet apart as if for Triangle, and ground evenly thru the bottoms of the feet. Lift the side ribs, but keep the shoulders down. Twist lift the right arm overhead and bend the elbow while reaching up the back with the left hand; join hands or clasp either ends of a belt. Stretch the elbows away from each other, while gently pressing them to the center. Switch sides.
Parsvokonasana (Lateral Angle Pose) Do this combination Warrior 2 (legs)-Triangle (side stretch) Pose. Ground evenly thru the soles of the feet, but really focus on lengthening the side ribs as you stretch from wrist to ankle on each side.
 Right Angle to the Wall Stretch Stand with the hands against the wall, even with the shoulders, and the step the feet back until your head, arms and side ribs are in a straight line. Press the finger tips to the wall as you stretch your sit bones back to lengthen the sides of the torso. To deepen the rotation of the shoulders, relax the upper back and let the head hang between the arms.**Is it just me, or do toddlers act just like cats when they get around a yoga mat?**
Vrksasana (Tree Pose) With the wall in reach (or against your back), move from Mountain in this balance pose (one knee bent, sole of that foot against the other leg). When you feel balanced, reach both arms overhead and repeat the stretch of Hastasana while keeping the shoulders down. Change sides.
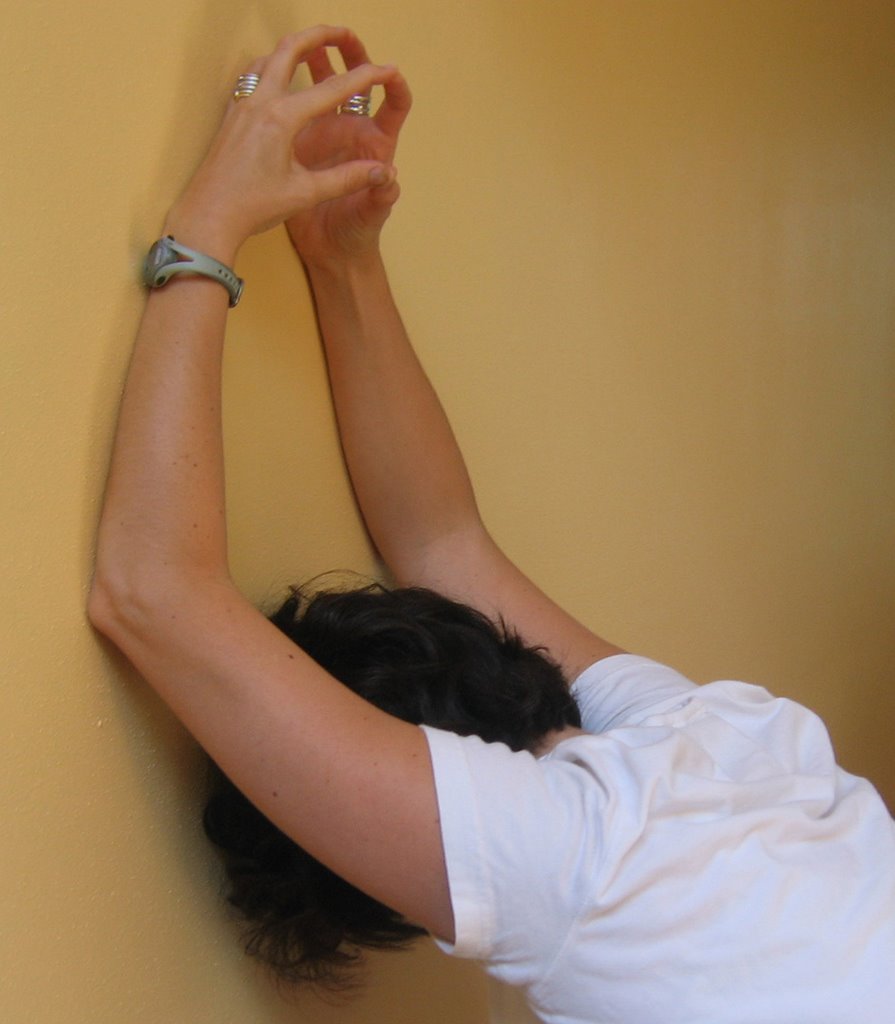
Tripod Shoulder Opener Form a tripod with the elbows, sides of the arms and sides of the hands (fingers clasped or fingertips pressing together). Press the tripod to the wall at shoulder height and step back until you can hang your head between your hands. Feel the stretch around the shoulder blades and in the armpits.

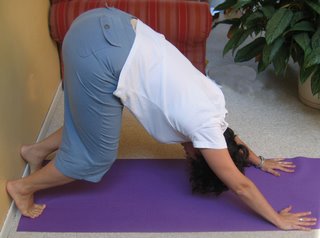
Modified Adho Mukha Svanasana (Downward-Facing Dog) Start on your hands and knees, with the heels just a few inches from the wall. As you come into Dog, keep your knees bent and let your heels rest again the wall. Make sure your arms are stretched out enough that you can really lengthen the back and side ribs. Don’t worry about straightening the legs. Try to keep the neck long and the shoulders away from the ears (same positioning as the Right Angle Stretch).
Balasana (Child’s Pose) Relax on the floor and concentrate on releasing thru the shoulders.
Full Adho Mukha Svanasana (Downward-Facing Dog) Come away from the wall and do a complete Dog. Keep the knees bent and the heels off the floor if you need to—you are focusing on the work of the arms and shoulders this time. If you get the upper body in a comfortable, rotated place you can try lengthening the back of the legs, but only if you are comfortable.
Balasana (Child’s Pose) Again, come down to the support of the floor. If you want to roll over into Savasana (Corpse) for a more complete relaxation, go ahead and do so. ©Brenda K. Plakans. All Rights Reserved.
Subscribe to:
Posts (Atom)
