Once you’ve been teaching yoga for a while (or anything, for that matter) I wonder if you can ever go back to being “just” a student. Whenever I attend a class or workshop, I find myself watching how the instructor deals with teaching issues, as well as simply participating in the practice. What modifications does s/he offer for Adho Mukha Svanasana (Down Dog)? What guidance does s/he give during Savasana (Corpse)? How does s/he deal with some one who refuses any suggested adjustments? I try to focus on my own practice but being in a class means interacting with a variety of students and I can’t ignore how other people are processing the information the teacher presents.
When I write a lesson plan, I try to imagine how the class will unfold for my students. Where will they need more instruction? Who will have difficulty with certain poses and needs a specific modification? I try to remember my student-only days and think about what made a class the most beneficial for me. I find a combination of words and action—and I’m not sure I could actually say how to create this combination—made the various asana come alive to me both physically and mentally.
I think the most important thing to me, as a student, is sensing that the teacher is tuned-in to the dynamics of the classroom. I want to feel as if s/he is watching how the instruction is being followed; if there needs to be more explanation; if we are getting the benefits of the pose or need to be adjusted; if s/he is willing to adapt the lesson plan to fit the needs of this particular group of students. I want a class to have a plan, but I want that plan to be organic so it can change if it needs to and the teacher is comfortable with going “off book.” And I like surprises: for instance, if the teacher sequences asana in an unexpected way that makes me experience the asana differently than I have before.
I also place high value on a sense of humor, a soothing voice and a deep level of understanding. Although it probably isn’t fair, I want my teacher to have more experience than I do with yoga. I’m not sure I would be happy with a teacher that was significantly younger than me (check out this New York Times article on the subject). I have never been in a class where youth and inexperience factor was an issue, but I’m pretty sure I would be skeptical…
What if your class and teacher are close to your ideal, but not quite? Pat asked last week about getting a teacher to talk less…I’ve been mulling the question, because I think it’s a good one. As a teacher, I want to know if some one is having trouble in the class and if I could do something to help them. As a student, I’m not sure I’d have the guts to comment of such a personal element of the class (good Midwesterner that I am)—especially if it seemed like the teacher was proud of his/her style of explanation. Maybe you could suggest a different approach to the teacher as something the class might try (adding a silent meditation? doing a class without music?) or ask if there are
quieter classes at your studio. I usually vote with my feet, if a class bothers me, but I’m not sure that is the most constructive solution.
What have any of you dear readers tried? How do those of you that teach prefer to get feedback? What do you all think are good/bad traits of a teachers (I realize it’s a personal preference, but I’m curious to hear what students value)? I’ve bared my soul (sort of) about what I like in a yoga class, now let me hear from you. ©Brenda K. Plakans. All Rights Reserved
Saturday, July 07, 2007
Sunday, July 01, 2007
Reading the Classroom (part one)
Wow, what a great response I received from the YJ article. I got a lot of hits over the past 5 days and quite a few nice comments, as well. It seems the concept of silence really hit a nerve with the yoga crowd, both teachers and practitioners. Instead of responding individually to the various comments, I've been inspired to write a bit about communication in the yoga classroom...partially in response to Pat's query, but also because I thought it might generate some interesting discussion about how teachers figure out what their students want/need and how students convey those desires.
I started my teacher training because, as a long-time student of yoga, I wanted to help people discover how energizing and useful it was as a practice. I had had so many good experiences both mentally and physically with the discipline that I wanted to share those discoveries. My own teacher's approach was based in Iyengar and was so common-sense and approachable and I wanted people to see that yoga was necessarily a bunch of turbaned pretzel-people chanting loudly and cleaning their noses out with string (altho if that is what you want, you certainly can find it), but a healing, sustainable practice available to everyone.
To that end, I try to be hyper-aware of whether my students are getting the benefits of the class and enjoying it, and try to check-in regularly to see if my assessment is correct. I can do some of this is just by watching faces during the practice; are people grimacing and tense or nodding, smiling, and closing their eyes peacefully as we hold a pose? I also watch bodies; are they in the pose correctly and attempting the adjustments I suggest or do they seem static or unengaged? At the end of class do people seem happy and relaxed or do they scuttle out of the studio as fast as possible, never to be seen again?
I also try more aggressive tactics, just to be sure. I pass out comments sheets towards the end of a session, with questions about likes/dislikes and even specifics about music, poses and commentary so that people have an anonymous way to communicate with me and, hopefully, feel they can be honest if something is bothering them. I encourage people to come early or stay late if they need to discuss something privately (especially if they have health concerns they'd rather not share with the class). I even have asked students directly how the class is working for them, but usually just if some one seems rather shy or is new--I don't want to put him/her on the spot, but want to offer a chance to say something if s/he seems reluctant to talk in front of my "regulars".
Some times I wonder if I may be a bit too concerned about my students' response to the material, instead of just letting the practice just speak for itself. However, I'd rather make sure some one is getting the experience I hope for them, instead of just throwing information out there and seeing if anything sticks. It is hard not to take a student's bad experience personally, even if they obviously just need a different kind of yoga, but I suppose that is something you get used to with more and more teaching experience. The whole point of asking for comments is to get them...the negative ones can be the biggest teaching tools.
If you are a teacher and wonder what effect your teaching has, maybe some of these ideas will help. Or, maybe you have some good suggestions for keeping the lines of communication flowing. For my next post, I'm want to take the student's side and turn the discussion around. Let me know what you think! ©Brenda K. Plakans. All Rights Reserved

Wednesday, June 27, 2007
More Silence
In keeping with the Silence theme, I wanted to post a link to my latest article in Yoga Journal's My Yoga Mentor newsletter, "Silence as a Teaching Tool." It's geared to yoga teachers, rather than practitioners, but I think there are some good comments about incorporating more quiet into your life. I am definitely one to talk rather than be silent, so there was a lot of food for thought from these interviews. Hope you find something useful in it!
Friday, June 22, 2007
Silence as a Living Tool
I’ve been editing another article for Yoga Journal’s My Yoga

Tuesday, June 19, 2007
Tag--I'm It!
Recently I got "tagged" by Kris from Total Health Yoga...but I was still offline on the islands, so I didn't get a chance to respond. Here are my answers. It was fun to try and think of appropriate answers and I had to go get a snack while working on my favorite foods. So, some info about me that hasn't come up on the blog before...
Four jobs I have held (I’m counting only paying jobs for this one):
1. Favorite job ever—costume coordinator for the Washington Opera in
2. Best paying job—costumer for 1998’s Wild, Wild West (nite shoots are quite lucrative)
3. First job—slinging popcorn at Karmelkorn in the North Grand Mall in
4. Current job and passion--Yoga teacher/blogger/free-lance writer and student
1. Spirited Away (I love how imaginative director
1a. Eamonn has been very into Finding Nemo these days; it is also extremely well-observed…look at the different qualities of the sea water
2. Childhood favorite—Willy Wonka and the Chocolate Factory
3. Good laugh—any thing with the Marx brothers
4. Queen Margot—I saw this French movie in the early 90s and remember it as breathtakingly beautiful, but I haven’t seen it since. I’m a little scared to find out it isn’t as lovely as I remember.
1.
2.
3.
4.
Four Categories of TV programming I enjoy (I am a slave to Netflix and don’t have cable):
1. Comedy—I am very into Arrested Development right now
2. HBO series—Sopranos and Deadwood (altho I wasn’t so crazy about Entourage or Curb Your Enthusiasm)
3. PBS Mysteries—every Prime Suspect
1.
2.
3. Japan (actually, I was on tour with the Opera—I was working—but we were in
4.
 Four of my Favorite Dishes:
1. Any fruit or veggie that is specifically seasonal—cherries, strawberries in June, peaches, asparagus, tomatoes, corn-on-the-cob
2. Japanese rice snacks—any of those bags of mix meant to be eaten with beer (although I’m not crazy about ika, the dried squid)
3. Cheesecake—maybe with a bit of strawberry sauce, but absolutely not flavored
4. Cheese—in general, and not just because I’m in
Four websites I visit daily (or at least frequently):
1. My various email accounts (3 of them)
2. statcounter.com (I love to see where visitors to GTTSB are from)
Four places I would rather be right now (I should say, I would rather be close to these places...as in a short drive. Too bad Wisconsin isn't right in the middle of all of them):
1. Ames, IA-where my parents are
2. Iowa City, IA (Austin, TX as of July 15)-where my sister is
3. Washington DC-where many of my friends are
4. Research Triangle, NC-where some more of my friends are
Saturday, June 16, 2007
Chair Warriors
As I’ve progressed through the end of the second trimester and into my third, I’ve noticed increased soreness in my hips. Some of this is due to weight gain and some to the loosening of my connective tissue as my body produces more of the hormone relaxin. This hormone “relaxes” (hence the name, I assume), or softens, ligaments and tendons so that there more room for a certain some one to pass through my pelvis at the end of August. This loosening deserves special attention because it is much easier to dislocate the joints during exercise and stretching—it seems like hip openers should become much easier (and they do), but care should be taken so you don’t over do it.
A simple way to modify poses so that you can enjoy the hip-opening benefits of standing asana, is to use a chair. You can get your legs in the proper positions, but your hip joints no longer support the whole weight of the torso. The leg muscles still get a mighty stretch in Virabhadrasana I, II (Warriors 1 and 2), you can lengthen the side ribs and spine, and you can hold the pose for awhile without getting as tired. Hip, hip hooray, right?

Warrior 1, with a chair Straddle a lightweight-but-sturdy folding chair, so that the back of your right thigh is resting on the seat of the chair. Bend your knee and place your foot so that the heel is directly below the knee. Extend the left leg behind you and turn the foot slightly out so that you can press your sole into the floor. Adjust your position on the chair so that the hips are square (hip bones—if you can still find them—are even) to the side of the chair and the pelvis is level. Stretch the arms overhead and interlock the fingers, if that is comfortable. If you get light-headed with the arms overhead, cross the arms at the lower back or bring your hands into the Namaste position behind your back to get a nice chest opener. Really focus on pressing the back of the left leg back and grounding evenly through the left foot to work the leg muscles. Keep the shoulders away from the ears. Then repeat on the left side.
 Warrior 2 with a chair Position yourself on the chair as before, but this time square the hips to the front of the chair, as in Warrior 2. The right knee is bent with the foot firmly planted and the left leg extends out to the side with the foot slightly turned in so you can rest the sole evenly on the floor. Line up your shoulders with your hips and your head with your tailbone. Lengthen the side ribs. From here, extend the arms to either side and turn the head to look over the right hand. As you hold the pose, keep extending the arms and lengthening the spine with each exhale. Repeat on the left side.©Brenda K. Plakans. All Rights Reserved
Monday, June 11, 2007
Aloha…Finally
 Well, apparently WiFi isn’t as ubiquitous on the islands as I thought. Then, upon return to the mainland, our modem died, so I have been offline for almost 3 weeks. Forever! However, it was a lovely trip with lots of beaching, gentle hikes (to accommodate the 3 yr-old and pregnant lady), haupia--coconut pudding--ice cream, mangos, flowering jacaranda trees, geckos, birdsong, eucalyptus and sunrises across the West Maui mountains (courtesy of said 3 yr-old’s wake up time of 5:30am, ug).
 A couple of milestones were reached while I was away: this blog had its first anniversary (May 22) and I entered my third trimester. I’m thrilled by the first, because I wasn’t sure I had the discipline to keep up with weekly entries; I’m also excited by the contact I’ve had with fellow bloggers stretching from Milwaukee to South Africa! The second is a welcome achievement, but I had forgotten how lumpy and awkward this phase of pregnancy is. My yoga practice is starting to change significantly and I have to concentrate on not grunting when I get up off the floor (especially as I start teaching again this week).
In the past year, I’ve tried to keep my postings of general interest. However, in light of this year’s development, I thought I’d focus a bit more on yoga and pregnancy for the rest of the summer. With the last kid, I noticed that the modifications I needed to apply were actually useful for anyone with mobility issues and could even bring awareness to yogis without any limitations, just by changing the pose slightly. So, I hope you all find this information and change of perspective interesting…it’s good to be back on the blog!

Monday, May 21, 2007
More Adjusting (Attitudes and Bodies)
Sunday morning of the conference, we had a session with David Swenson on “Safe Adjustments.” David is one of the foremost teachers of Ashtanga-style yoga in this country. Ashtanga requires a very strong upper body (and resilient wrists) and is often practiced with an athletic series of Sun Salutes that uses jumps between each pose and a lot of challenging work in the upper arms. Again, a better style for younger, more flexible bodies—and was actually developed by K. Pattabhi Jois for energetic teenage boys—but is very popular because of the work-out it provides and, I assume, for the focus it requires.
As with Ana Forrest’s class, I wasn’t expecting to be able to do much of the work--not that my Chaturanga Dandasana has ever been that impressive--but I figured I’d see what he had to say. He was such a refreshing presenter! His discussion was funny and laid-back and he never proselytized. He was very upfront about Ashtanga and said (I’m paraphrasing, a bit), “I don’t think Ashtanga is necessarily the best yoga out there, but I do it because I happen like it the best of all.” How pleasant to not get a brow-beating about what’s wrong with the other approaches or complaints about other teachers’ egos. He was rangy and bouncy--sort of like Tigger--and used his body to demonstrate common mistakes in basic poses that had us all laughing (for example, keeping the neck stiff and lifting the head above the arms in Adho Mukha Svanasana (Down Dog)—solved by having the student bend his/her knees to release the lower back and allow more rotation in the shoulders).
I’m still a bit leery of Ashtanga (and I read about a lot of practitioners who have to stop because of injuries), but I really enjoyed David’s manner. His information was good and we did a lot of partnering, which is always useful for teachers to get some practice on a real body. Some of the adjustments were a bit advanced, and I’d hesitate to do much with many of my students’ Parivrtta Trikonasana (Revolved Triangles). However, the session put everyone in a good mood as we were all starting to get a bit tired at that point. I appreciated the feeling that he was merely imparting some useful information, rather than trying to sell us a line. And, believe me, there was a lot of “line-selling” that weekend. ©Brenda K. Plakans. All Rights Reserved
**On a more tropical note, I’m off to Maui tomorrow, for a vacation and one (four!) last plane trip before I’m grounded for the rest of the summer. I’m going to try and post a few ideas for pregnancy modifications, unless the spirit of aloha moves me to write something else. We’ll have a computer with us, but I’m not sure how much internet access we will have. It seems like everyone is online over there, tho, so I don’t think it will be a problem. Catch you from the Pacific!**
Friday, May 18, 2007
Attitude Adjustment


Thursday, May 10, 2007
Opening Comments...
I’m a little side-tracked with my next Yoga Mentor article right now (“Silence as a Teaching Tool”), but I wanted to post a few of my observations from the Yoga Journal conference that I went to last weekend in Lake Geneva, WI.
Wednesday, May 02, 2007
Forward Bends, redux
This week in class we’ve been working on forward bends. I wrote about this group of poses back in March, emphasizing the actions of the pelvis and hip joints and the flexibility in the legs and lower back. You should also be aware of the role of the spine in all of this hinging and folding. Try to do the following series, but really focus on lengthening the spine before you begin to bend. As you lift the top of the head up and ground into the sit bones, you will feel the side ribs lengthen and the lower back open. This increased space, especially in the lumbar spine, will allow the pelvis to tip farther forwards and deepen the fold at the hip crease.
Sukhasana (Easy Pose) Sit in a comfortable, cross-legged position with the sitbones on a folded blanket. Increase the height of the blanket if you can’t sit without rounding the lower back. Take a few minutes to really concentrated on balancing the pelvis and lengthening the spine. Stretch the arms overhead to feel the lift in the side ribs, and then lower the arm but keep lifting in the side body.


-Bring the right arm straight up and then drop is slightly to the back to increase the twist. Bring it down to your right hip, or, if it doesn’t affect the length of the spine, reach over and take hold of the other side of your left foot. Breathe deeply and try to extend into the pose every few breaths by stretching the top of the head away from the tailbone. Slowly release the hands and bring the torso upright. Untwist and then return the legs back to Staff Pose. Repeat on the other side.
Monday, April 30, 2007
Apropos of Nothin'
This short post has nothing to do with yoga, but is a quick shout-out to my Mom's new blog, Latvia's Friend. She is a part of a knitting trip that is vising Scandinavia and the Baltics in July; Latvia's Friend is intended to give the group some information about that part of the world.
If you want to see some great pictures of storks and church spires, check it out!
If you want to see some great pictures of storks and church spires, check it out!
Friday, April 27, 2007
Getting Rid of the Judge
(For the last few months I have been heavy on the Yoga Practice, not so much on the Yoga Thoughts. Let me try and remedy this situation…)

Monday, April 23, 2007
Keep Track in Back
Last Thursday, I taught a Warrior class with special emphasis on the back foot. It’s a variation that my teacher in Washington DC, Oya Horiguchi, is fond of because it makes you so aware of the placement of your hips and the grounding of the feet. In Virabhadrasana I, II, III much of your focus, and even your movement, is forwards, so there is a tendency to lean that direction and forget about what is going on behind you. By isolating the action of the back foot and leg, you become aware of that side of the body and get a much more even stretch. Let me show you…(my pictures are of the regular poses—to modify, just arrange your mat perpendicular to the wall with one edge touching and follow the directions below).

Stand with your back to a wall, and then step the right foot forward into the pre-Warrior straddle. Make sure the left heel is in contact with the wall, so when you ground through the sole of that foot you are aware of the pressure of your foot against the wall. Maintain that pressure as you lengthen the back of the left leg and gently press the left hip forward so that it is even with the right. Now bend the right knee, keeping it in line with the top of the right foot. Check in with the left leg, are you still pressing the heel to the wall and lengthening the back of the leg? Once you establish the lower body, lift the arms overhead, interlock the fingers and lengthen the neck back. Again, see if the left leg has started to soften, and if it has, re-press and engage. Repeat with the right foot in back.

This time, stand with your left side at the wall and step into a side straddle, with the side of the left foot against the wall. Turn your right foot towards the front of your mat, and turn the left toes slightly toward center. Again, solidly ground through the bottoms of both feet and notice the press at the wall. Bend the right knee, keeping your right thigh and both hips parallel to the side of your mat. Be keenly aware of the contact of your left heel and the work of the left thigh to keep the foot in place. Now raise your arms to either side, extend and turn your head towards the right hand (you may have to rest your left palm on the wall).
Bring your attention to the back leg, making sure the knee hasn’t softened and the heel is still grounded. Check to see that you haven’t shifted your weight onto the toes of the right foot (lift them and press into the heel). Lift the side ribs and align the head with the tailbone, which should be easier because of the strength of your base. Repeat with the right foot in back.
 Virabhadrasana III (Warrior 3)
Warrior 3 is a bit harder to work with, because of the balance aspect; nonetheless, bringing awareness to the back leg and foot make it a stronger pose and help you level out the hips. You may find the contact between foot and wall help you balance longer, as well. Measure your starting point, by standing facing the wall and stretching out your foot at a right angle to your standing leg, so the sole of the extended foot is touching the wall. Lower the leg and turn to face away from the wall.
Wednesday, April 18, 2007
A Change in Perspective
The other key is to think of the pose as a chest opener, even if the arms are in front of the body. If you don’t engage the upper back by drawing the shoulder blades together and down (away from the neck), the torso will sag and you will put extra weight on your head. You need to feel that opening across the chest and that pressure of the forearms to the floor to keep the spine long all the way from the skull to the tailbone. The following practice will emphasize this opening, so when you do come up, you can already have the feeling in your body.
Give it a try, with your thoughts in your chest and upper back. If you haven’t done a headstand for awhile, just do the prep poses and keep the feet on the floor in the half-headstand (or Dolphin pose). Enjoy the feeling of upside down (and keep an eye on your cat or dog--or toddler--this pose seems to encourage pets and kids to sit right by your face, Achoo!).
Salamba Sirsasana (Headstand)
**Don’t try a headstand, until you have learned how to do one with an experienced teacher. S/he will teach you the proper positioning so you don’t hurt your neck. **
Tadasana (Mountain Pose)-Feel your tall, aligned spine as you ground down through your feet and stretch up through the top of the head. Gently draw the shoulder blades together and down the back (but don’t arch the upper back).
Hastasana (Overhead Arm Pose)-Add the arm stretch and feel the side ribs lift, while keeping the shoulders away from the ears. Bring your attention to the shoulder blades, again, but maintain the length in the spine.
Uttanasana (Intense Forward Bend)-Fold from the hips while stretching through the backs of the legs. Keep the weight balanced between the balls and heels of the feet. Bend the knees slightly to release the lower back and let your torso hang.
Adho Mukha Svanasana (Downward Facing Dog)-Keep the spine elongated while the shoulder blades slide down the back (away from the shoulders). Although you are inverted, concentrate on keeping the chest open and the arms strong (as they were in Hastasana).
Balasana (Child’s Pose)-Come down to the floor and let the whole body relax
Salamba Sirsasana (Headstand)-Try this against the wall, or, better yet, in a corner so that you have support at your back and heels. Use a folded blanket under the head and forearms for cushioning. Keep the elbows shoulder-distance apart (but not more) so you can press the forearms to the floor. Kick up each leg separately, until the heels are against the wall. Try to recall the aligned feeling from Tadasana, except this time reach through the head to the floor and the heels to the ceiling. Recreate the open chest/engaged arms and shoulder from Dog so the upper body doesn’t sag.
Half Headstand-if you’re not ready for the full pose, try this modification. Make a tripod with the hands and forearms and place the top of the head (halfway between the ears) on the floor so the palms are resting against the back of the head and the knuckles are gently resting against the wall. Straighten the legs as for Dog, so that only part of the torso’s weight is balanced on the head. Slowly walk the feet forwards to bring the back closer to the wall
Balasana (Child’s Pose)-Lower yourself back to the floor and rest as long as you like.
Seated twist-Take advantage of your stretched-out torso as you slowly twist the ribcage around the spine, while sitting in Sukhasana (Easy Pose).
Savasana (Corpse Pose)-try to recreate the alignment from your Mountain and Headstand, while releasing all your muscles into the support of the floor. ©Brenda K. Plakans. All Rights Reserved.
Wednesday, April 11, 2007
You Call This April!?!?
I don’t know what the weather is like in your part of the world, but in mine—Wisconsin—it stinks. We are supposed to have 3-5” of snow today, with the possibility of accumulating 8-12” by this evening. All the daffodils and iris and tulips have lovely green shoots that are now completely weighted down with snow. At least the goldfinches have started to turn yellow again, so they are sort of pretty against the white (if you need something positive to say about all of this).

[Breath is indicated if you are doing this as a flow sequence; otherwise try to hold each pose for at least 5 breaths]
Tadasana (Mountain)[inhale-exhale]: standing with the feet parallel, open the arms to the sky and slightly arch the back. Keeping the back long, fold forward at the hips.
Uttanasana (Intense Forward Bend)[inhale-exhale]: reach for the thighs/shins/ankles-- first with straight arms and a long back, then bend the arms and relax the back to let the head come closer to the knees
-Both hands come to floor and step the right foot back while bending the left knee [inhale].
Virabhadrasana I (Warrior I) [exhale]: lift the torso and reach the interlocked fingers overhead, looking towards the hands. {Modify by keeping the head looking forwards and rest the hands on the left thigh.}
-Fold forwards and bring both hands back to the floor [inhale].
Adho Mukha Svanasana (Downward Dog) [exhale]: step the left foot back, lift the hips and lower the head into Dog.
Plank [inhale]: lower the hips and straighten the back.
Urdha Mukha Svanasana (Upward Dog) [exhale]: sink hips towards the floor and lift the head into Up Dog. {Modify by lowering the knees to the mat.}
Plank [inhale]: lift the hips to be level with the shoulders and straighten the back.
Adho Mukha Svanasana (Downward Dog) [exhale]: lift the hips and lower the head into Dog.
-Step the right foot forward [inhale].
Virabhadrasana I (Warrior I) [exhale]: lift the torso and reach the interlocked fingers overhead, looking towards the hands. {Modify by keeping the head looking forwards and rest the hands on the right thigh.}
-Both hands come to floor and step the left foot forwards while bending the both knees [inhale].
Uttanasana (Intense Forward Bend)[exhale]: straighten the legs and reach for the thighs/shins/ankles and bend the arms, letting the head come closer to the knees.
Tadasana (Mountain)[inhale]: Straighten the legs without locking them and, unfolding from the hips, come back to standing. Lift the arms to the sky.
Anjali Mudra (Namaste hand position) [exhale]: lift from the top of the head and ground through the soles of the feet as you bring your palms together at chest level. Repeat entire, starting with the left foot. ©Brenda K. Plakans. All Rights Reserved.
Friday, April 06, 2007
Yoga face…
There was an article in last week’s New York Times about a new kind of yoga class: facelift yoga. Apparently, some studios have started offering classes that promise the kind of tightening and lifting you can get under the knife, through yoga practice. One studio even got a threatening letter from the Botox people for naming a class “Yo-tox” (I’m not sure I understand wanting to equate your practice to a chemical you inject to paralyze facial muscles—kind of an oxymoron, don’t you think?).
Sukhasana (Easy Pose) Sit in a comfortable, cross-legged position with the sitbones on a folded blanket. Increase the height of the blanket if you can’t sit without rounding the lower back. Take a few minutes to really concentrate on balancing the pelvis and lengthening the spine.
 Virasana + Namaste (Hero Pose with Namaste hands in back) Lower your hips between your ankles (or onto a block), trying to keep the knees together. Keep the lower spine long and make sure the tailbone points down. Try to hold the pose for a while and, if you can, lower your hips closer to the floor to deepen the stretch. This may work better with a folded blanket than a block under the hips. Bring the hands behind the back and either cross the arms at the lower back or bring the hands to the prayer position.
Shoulder Opener at the Wall Come to standing. Make a tripod with your hands and arms, so that the fingers are interlocked and the elbows are shoulder distance apart. Press the forearms to the wall at chest-height and step the feet back, so you fold at the hips. Drop the head between the forearms and feel the stretch around the shoulder blades and arm pits. Deepen the stretch by stepping farther away from the wall.

Monday, April 02, 2007
A Blast from the Past
First of all, check out my article in yogajournal.com's newsletter for teachers, My Yoga Mentor. It's about refreshing your teaching, if you find yourself in a rut, with suggestions from various senior teachers.
Secondly, I apologize for the break in postings...I've been bogged down with a very demanding project and haven't had time to write something new. So, I've dug down into the "archives" to find a favorite posting from last summer. Hopefully, it's new to many of you and for those of you who remember it, maybe the review will inspire a nice round of beautifully-executed Dogs. Here it is...
Learning to Love the Dog (Again)
After class last week, a couple of my students were discussing how much trouble they had with Adho Mukha Svanasana (Downward-Facing Dog) and decided that they just didn’t have the upper body strength for the pose. This is a common problem for people with stiff shoulders or upper backs; the pose becomes a version of Plank Pose, because they can’t lengthen the upper torso and rotate their shoulders enough to get into the inverted V of Dog. All the weight of the upper body is on the arms and wrists, instead of being equally suspended between the legs and arms. This is a very strenuous position and, because of the strain, people stop breathing evenly and blood starts to rush to the head. Needless to say, this does not make for a very calming pose.
 Right Angle to the Wall Stretch Stand with the hands against the wall, even with the shoulders, and the step the feet back until your head, arms and side ribs are in a straight line. Press the finger tips to the wall as you stretch your sit bones back to lengthen the sides of the torso. To deepen the rotation of the shoulders, relax the upper back and let the head hang between the arms.**Is it just me, or do toddlers act just like cats when they get around a yoga mat?**

Tripod Shoulder Opener Form a tripod with the elbows, sides of the arms and sides of the hands (fingers clasped or fingertips pressing together). Press the tripod to the wall at shoulder height and step back until you can hang your head between your hands. Feel the stretch around the shoulder blades and in the armpits.
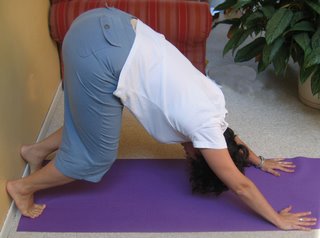
Secondly, I apologize for the break in postings...I've been bogged down with a very demanding project and haven't had time to write something new. So, I've dug down into the "archives" to find a favorite posting from last summer. Hopefully, it's new to many of you and for those of you who remember it, maybe the review will inspire a nice round of beautifully-executed Dogs. Here it is...
Learning to Love the Dog (Again)
After class last week, a couple of my students were discussing how much trouble they had with Adho Mukha Svanasana (Downward-Facing Dog) and decided that they just didn’t have the upper body strength for the pose. This is a common problem for people with stiff shoulders or upper backs; the pose becomes a version of Plank Pose, because they can’t lengthen the upper torso and rotate their shoulders enough to get into the inverted V of Dog. All the weight of the upper body is on the arms and wrists, instead of being equally suspended between the legs and arms. This is a very strenuous position and, because of the strain, people stop breathing evenly and blood starts to rush to the head. Needless to say, this does not make for a very calming pose.
So, in honor of Madame Purl and Dan, I offer this sequence for shoulder opening. Be honest with yourself and don’t overdo any of the stretches or force your body out of alignment. The idea is to work on the rotation of your shoulders and find a place where you can feel the upper back working, while the spine is still lengthening. Even if you don’t have trouble with your Dog, this is a wonderful series to work any tension out of your upper torso and will help you stay in DFD even longer to get the maximum benefits of the inversion. Enjoy!
Shoulder Opening Sequence
Tadasana with Hastasana Arms (Mountain Pose with Overhead Arms) Extend the spine and side ribs as you stretch your palms towards the ceiling. Keep the neck long and the shoulders away from the ears. If you need to slightly bend the arms to stretch up, do so.
Extended legs with Gomukhasana (Cow’s Head Pose) Arms Step your feet apart as if for Triangle, and ground evenly thru the bottoms of the feet. Lift the side ribs, but keep the shoulders down. Twist lift the right arm overhead and bend the elbow while reaching up the back with the left hand; join hands or clasp either ends of a belt. Stretch the elbows away from each other, while gently pressing them to the center. Switch sides.
Parsvokonasana (Lateral Angle Pose) Do this combination Warrior 2 (legs)-Triangle (side stretch) Pose. Ground evenly thru the soles of the feet, but really focus on lengthening the side ribs as you stretch from wrist to ankle on each side.
 Right Angle to the Wall Stretch Stand with the hands against the wall, even with the shoulders, and the step the feet back until your head, arms and side ribs are in a straight line. Press the finger tips to the wall as you stretch your sit bones back to lengthen the sides of the torso. To deepen the rotation of the shoulders, relax the upper back and let the head hang between the arms.**Is it just me, or do toddlers act just like cats when they get around a yoga mat?**
Vrksasana (Tree Pose) With the wall in reach (or against your back), move from Mountain in this balance pose (one knee bent, sole of that foot against the other leg). When you feel balanced, reach both arms overhead and repeat the stretch of Hastasana while keeping the shoulders down. Change sides.
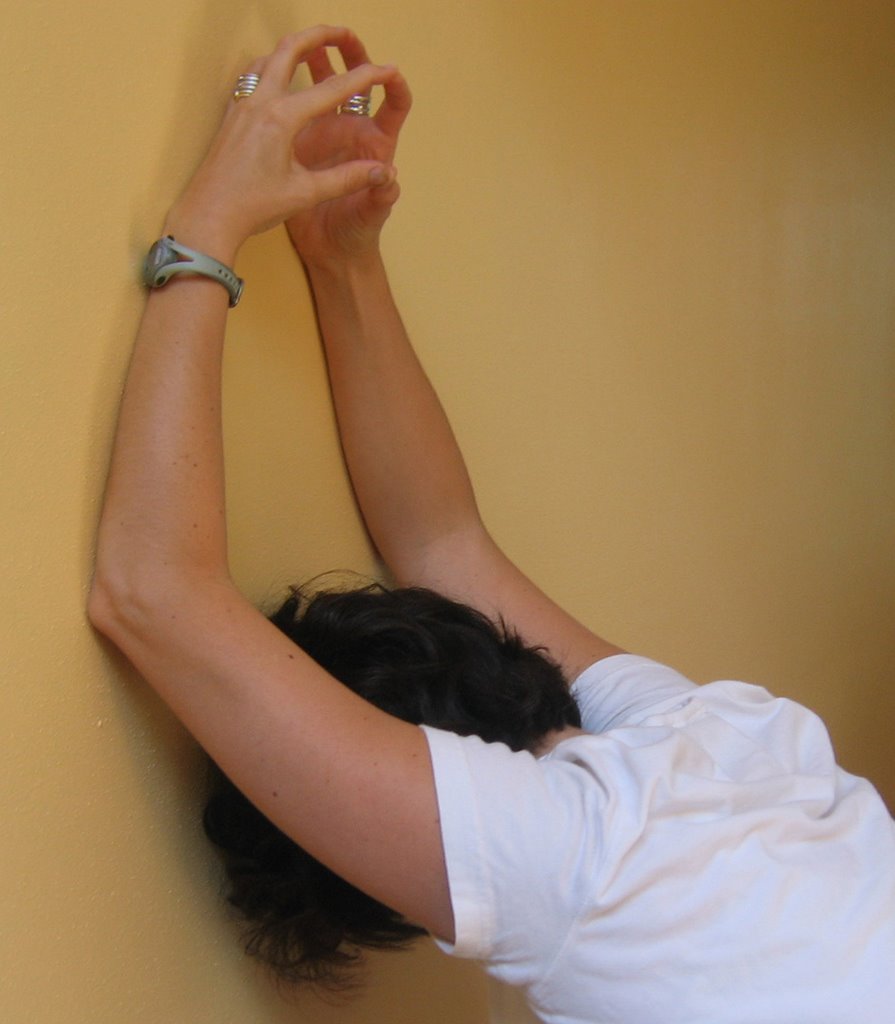
Tripod Shoulder Opener Form a tripod with the elbows, sides of the arms and sides of the hands (fingers clasped or fingertips pressing together). Press the tripod to the wall at shoulder height and step back until you can hang your head between your hands. Feel the stretch around the shoulder blades and in the armpits.

Modified Adho Mukha Svanasana (Downward-Facing Dog) Start on your hands and knees, with the heels just a few inches from the wall. As you come into Dog, keep your knees bent and let your heels rest again the wall. Make sure your arms are stretched out enough that you can really lengthen the back and side ribs. Don’t worry about straightening the legs. Try to keep the neck long and the shoulders away from the ears (same positioning as the Right Angle Stretch).
Balasana (Child’s Pose) Relax on the floor and concentrate on releasing thru the shoulders.
Full Adho Mukha Svanasana (Downward-Facing Dog) Come away from the wall and do a complete Dog. Keep the knees bent and the heels off the floor if you need to—you are focusing on the work of the arms and shoulders this time. If you get the upper body in a comfortable, rotated place you can try lengthening the back of the legs, but only if you are comfortable.
Balasana (Child’s Pose) Again, come down to the support of the floor. If you want to roll over into Savasana (Corpse) for a more complete relaxation, go ahead and do so. ©Brenda K. Plakans. All Rights Reserved.
Subscribe to:
Comments (Atom)
